~ Welcome to my ~
MERRY DAY #8
Today we will continue with the parade of needlework stands and focus on:
Day #3 ~Needlework Stands Review ~
ROLAFRAME LAP AND FLOOR STANDS
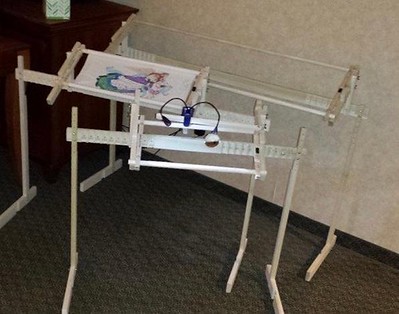
Rolaframe Lap Stand:
Here is what it looks like fully assembled - it comes to you in a box not assembled with diagram schematics to put it together. (shown with a Rolaframe scroll frame in photo)

The frame is FULLY adjustable to your preference for stitching.
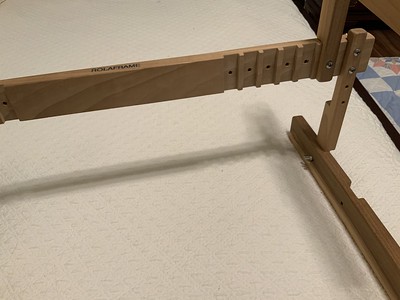
RED ARROWS: shows the two places you can put the legs of the stand - one of course is very close to the body (this would be I would assume if you were stitching on a smaller project) I have placed mine in the second leg placement and have left it like that from the beginning.
PINK ARROWS: shows the two height settings for the legs (which hold the scroll bar arms) I'm tall so I always have set mine to the upper position.
BLUE ARROWS: shows the placement for the scroll bar arms - which hold the project on a Rolaframe scroll frame - where you place the arms is dependent on the width of your Rolaframe scroll frame. The lap stand will technically only hold scroll frames with width of 8 inches to 18 inches
(HACK - you can make it work with 19 and 20 inch frames if you loosen the screws.... the design I've got loaded is on a 20 inch scroll.)

What I have just shown above, of course is the same on the other side of the stand:
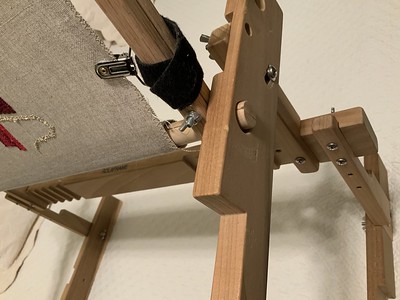
To load your piece onto the stand, simply place the end of the Rolaframe scroll frame into the hole "O" on one side:
And the other end will be placed in the "U" shape on the other side. This allows for the scroll frame to be firmly held without moving, yet easy enough to flip up for thread starting/ending or to quickly take out of the stand and flip to attend to the back side. Effectively the frame will only move 180 degrees, it will not rotate 360 degrees.
ALSO NOTE: there is a slide screw (see top left behind U) this is fully articulated to allow the angle of stitching you prefer to stitch at - again this stand is fully adjustable to your stitching preferences.
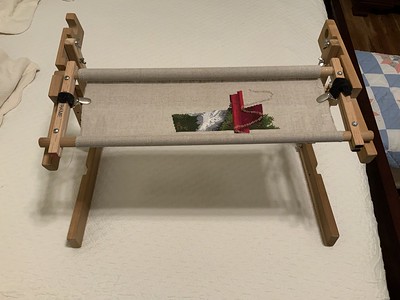
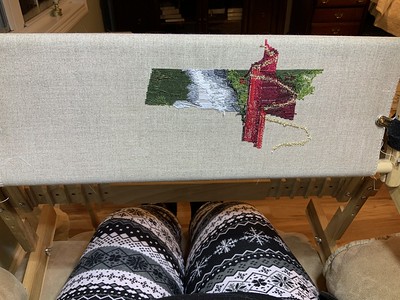
Here is what it looks like fully loaded on the stand and ready to stitch:
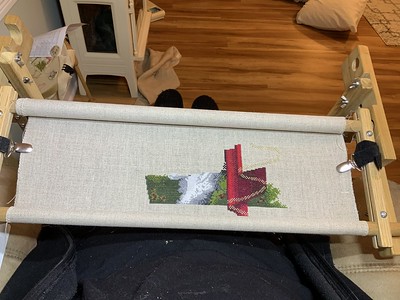
Flipped up to start/check/end thread (shown only 90 degrees flipped up but will go an entire 180 degree flip):
To stitch you just slide the legs alongside of you in your chair:
Here it is pulled and ready to stitch. It is sort of like buckling yourself into a rollercoaster, all buckled up and ready to stitch!
Here is what it looks like to flip up when you are stitching in your chair:
ROLAFRAME FLOOR STANDS:
There are the 3 different sizes of Rolaframe Floor Stands available.
SMALL: 28 inches, largest scroll able to use: 28 inches, smallest: 8 inches
MEDIUM: 38 inches, largest scroll able to use: 38 inches, smallest: 19 inches
LARGE: 45 inches, largest scroll able to use: 45 inches (which is the largest scroll rod made by Rolaframe) and smallest: 29 inches
Again this floor stand is fully adjustable to you, in height and in width, the frame arms accept the scroll frame in the same way it accepts the frame on the lap stand (the O circle on one side and U on the other) It again has the slide screw on the arms to adjust to your preferred slant when stitching. I know that it looks like those legs would just break off or the stand would be wobbly, but it IS NOT. As long as you have it fully assembled correctly and all nuts are tight it is a solid stand.
I own the medium size floor model and I love it. I can make it tall enough to fit over the arms of my stitching chair (again sort of like buckled up and ready to stitch) or I can sit at the frame with a chair or office chair and pull myself up to it and stitch fully content.
PLEASE NOTE: there is really no difference in the floor stand and lap stand other than: one sits IN your lap and the other stands ON the floor.
ROLAFRAME LAP STAND PROS:
1.) fully adjusts to the stitcher's body and preferential way of stitching
2.) perfect for holding the Rolaframe once you get the frame in there it is not going anywhere
3.) makes the stitching experience very comfortable
4.) easy to use, easy to maintain
5.) sturdy and balanced
6.) if you want to stitch sitting bed - this frame is fantastic - it fits over your legs and like a breakfast tray and you could stitch all day
7.) Made in America by Dan King - who owns the Splinter Shoppe in Huntsville, AL
ROLAFRAME LAP STAND CONS:
1.) you can only use Rolaframes in the stand - no other iteration
2.) when you first get your stand there are a lot of parts and pieces and the first time putting together can be a little confusing - after that you understand how it goes together and no big deal
3.) its a little large and unwieldy to store - if you don't want to take it apart
ROLAFRAME FLOOR STAND PROS:
1.) fully adjusts to the stitcher's body and preferred way of stitching
2.) absolutely perfect for extra large sized projects....you like BIG projects - this stand system is ABSOLUTELY for you!
3.) holds the frame securely and perfectly
4.) makes stitching very comfortable
5.) sturdy construction and balanced
6.) easy to maintain
7.) American made by Dan King, Splinter Shoppe in Huntsville, AL
ROLAFRAME FLOOR STAND CONS:
1.) can only use Rolaframes in the stand - no other iteration
2.) putting together can be confusing first time
3.) it is large and therefore hard to store if you don't want to take it apart
SO let's talk about Rolaframes scroll frames....
They are a scroll frame rod (they call them rollers) and end bar system.
Bottom line on what rod size is right for your project is: you cannot use a smaller width rod on a project that measures wider than the rod,
BUT
you can use a larger width rod on a project that measures a smaller width than the rod.
EXAMPLE: I have a 24 inch wide project. I can use a rod that is at least 24 inches wide. If I have a rod that is larger than 24 inches I can use it too. BUT if I have a rod that is 23" inches wide or below - it is a no go.
ROD SIZES: range from 8 inches all the way up to 45 inches wide. They are split down the middle of the rod and one half of the rod has nail tacks embedded in it to put your fabric in by piercing the fabric **don't worry it does not tear your fabric, the threads wiggle aside as you carefully load the fabric and then the other half has holes drilled to accept the nails into it to once fabric is loaded. You do not have to sew the project on or buy that sticky velcro stuff for every project to load it into the scroll frame.
END BAR SIZES: range in size from 7 inches to 22 inches. End bars hold the rods and selection is fully based on what YOU want for the amount of project showing while stitching. I personally prefer very little of my stitching showing while stitching (keeps it cleaner that way because I'm like Pigpen in Charlie Brown) HOWEVER: when I stitch something beaded or with specialty stitches, I change my end bars as I stitch to make it taller and taller so that I don't have to roll my project. This means that I have several end bar sizes up to the largest size because I do that. For just regular stitching: I prefer end bar sizes 7, 8, 10 and 12 inches, My favorite is: 7 and 8's
ALRIGHT so you got your money's worth today....
with me blathering on about Rolaframe. I have used Rolaframe literally, for years - even before Dan (the owner) took it over from his Uncle. When I started showing pictures of my work on my blog, years ago, people started asking me about my frame. I started telling people about them. I even blogged about them when so much interest was shown. I am happy to say, I believe that Rolaframe enjoyed a huge uplift in people using them and knowing about them because I have been very vocal over several years about how much I like Rolaframe. I own so many Rolaframe rollers and end bars I could open a store. That's how much I love Rolaframe. Period.
I did several blogs about them (now gone because of losing my blog last year) and I did a couple of videos on how to load a Rolaframe and how to use the lap stand. Those are deleted now, because if one takes a trip through YouTube and you will find many people have done videos about them. There is no need for my voice among those now singing the praises of Rolaframe.
Now there are other scroll frames out in the market, of course. There is a particular one that is made in the UK that has become very popular and everyone who is anyone has to have one, except me. I've seen the frame, I've held one, even stitched on a friends to see how it worked and yes it is very, very quality. It holds fabric taut and firm and I can see it is a superior work of craftmanship. But I am loyal to hardworking, family owned, American made. Dan King is an exceptional man, he is raising a family. Rolaframe is his livelihood. Rolaframe is a quality, American made product. Like you know and like I've said before: I'm American, buying American is important to me. I am a lot of things in life, the best thing I am (in my mind) is loyal - like an old hound dog. I am loyal to Rolaframe and I use their products, if not daily, pretty doggone frequently and have, like I said, for years.
So there you go folks....Day #3 of my needlework stand review on Merry Day #8!
Merry Day #8!
Merry Christmas!
All my love,
Vonna xxxx


Love the info on the frames. Happy to see you support American made!
ReplyDeleteVonna: I am like you I have several different frames and stands, the Rolaframe is one I should have, I will be looking it up soon.
ReplyDeleteThank-you for the in-depth tutorial.
Merry Christmas
Catherine
I love seeing the buy American products- I always try!
ReplyDeleteHello! I have a question, let's see if I can make it clear for a reply, LOL. I believe I see that the fabric is rolled so that the stitching area is lower than the rollers/rolled fabric. So it looks like you have to "reach over" the rollers/rolled fabric and go 'down' into the area to stitch. Does this make sense? Is this just a matter of preference? For myself, when I use a hoop or qsnaps, I place the fabric "over" the hoop or over the qsnaps so my stitching area sit up higher than the edging/holding tool (hoop or qsnaps)...this way my stitching area sits up high, no "dipping down into" the stitching area. Thanks for any insights. Sincerely, Barbara
ReplyDeleteYes it’s called “stitching in the ditch” that way the backside shows when rolled and your arm or hand never touched the front pretty side. Any dirt or oils are on the backside, it also protects the stitches when I roll my scrolls and as I work. Thanks for asking
DeleteI understand the logic. Thank you!
Delete